
How to Share statpx Analytics Access with Your Team, Clients, or Freelancers
Analytics data is most useful when the people who act on it can see it. A developer who can see the traffic data while debugging. A content writer who can check which posts are driving the most sessions. A client who wants to see monthly traffic without logging calls to ask you. These are all different access scenarios, and statpx handles each of them.
There are two distinct ways to share access in statpx: team member invites (for people who need a login and full data access) and public share links (for anyone who just needs to see aggregate numbers without creating an account). This guide covers both.
Two Ways to Share Analytics in statpx
Before inviting anyone, it's worth understanding which option fits your situation:
- Team member invite — the person gets a statpx account (or uses their existing one), logs in, and sees all the same data you see, scoped to the sites you've invited them to. They can be assigned a Viewer or Editor role. Best for colleagues, employees, and contractors who work with your site regularly.
- Public share link — a secret URL that anyone with the link can open in a browser, no login required. They see a read-only summary view of your traffic: total pageviews, sessions, top pages, referrers, countries, and the traffic chart. No individual visitor data, no settings, no email addresses. Best for clients who just want to check on traffic, or anyone you want to give lightweight visibility to without creating an account.
Inviting a Team Member
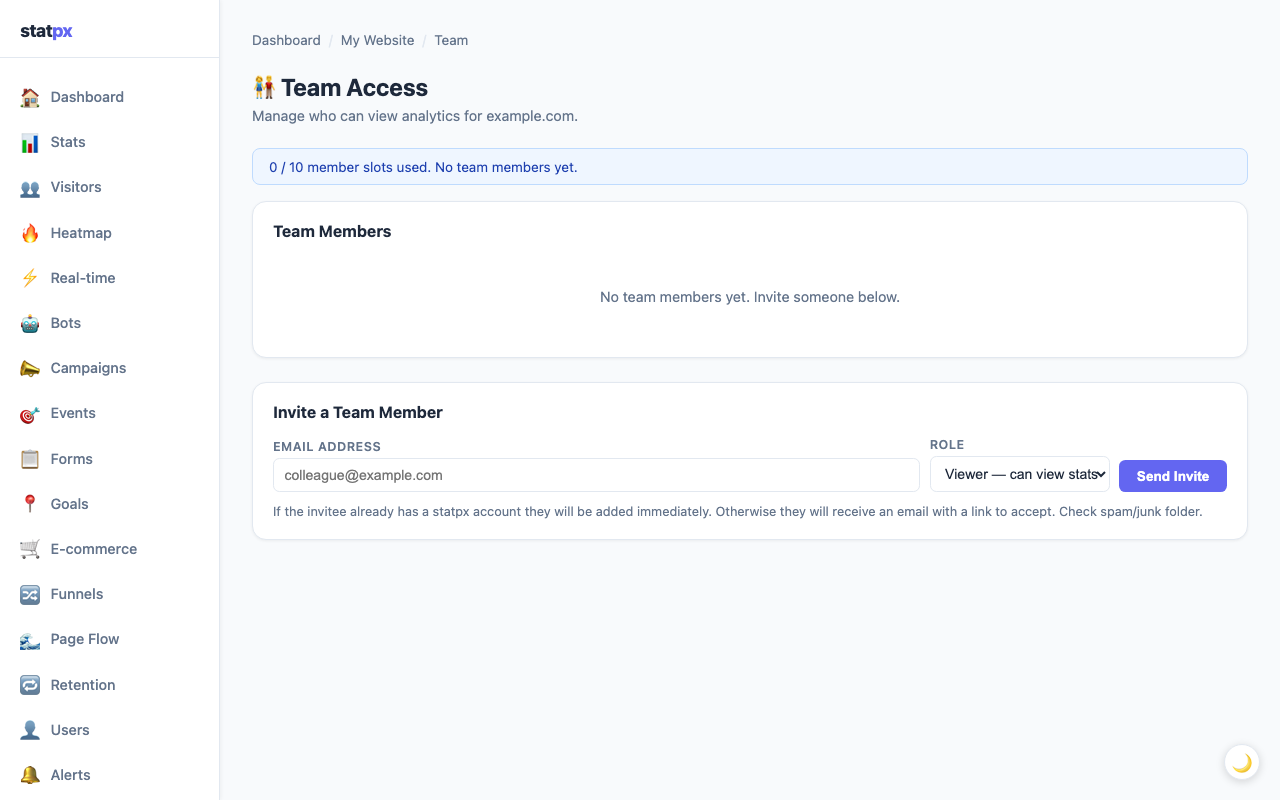
Go to the Team page for your site in statpx — it appears in the site navigation for site owners. You'll see a field to enter an email address and a role selector.
- Enter the team member's email address
- Select their role: Viewer or Editor
- Click Send Invite
statpx sends an invite email to that address. The recipient clicks the link in the email to accept. If they already have a statpx account, they'll be taken directly to your site's dashboard after accepting. If they don't have an account yet, they'll be prompted to create one first — the invite is still waiting for them after registration.
Note: Invites are per-site. If you own multiple sites in statpx, you need to send a separate invite for each site you want the team member to access. A person you invite to Site A cannot see Site B unless you also invite them there.
Viewer vs Editor Roles
statpx uses two roles for team members, designed to cover the most common access scenarios:
| Capability | Viewer | Editor |
|---|---|---|
| View all stats pages (dashboard, top pages, referrers, countries, devices) | Yes | Yes |
| View visitor log and individual sessions | Yes | Yes |
| View campaigns, events, bots | Yes | Yes |
| Create and edit goals | No | Yes |
| Create and edit alerts | No | Yes |
| Create and edit funnels and annotations | No | Yes |
| Change site settings | No | No |
| Delete the site | No | No |
| Manage team members | No | No |
Use Viewer for anyone who needs to read and monitor traffic but shouldn't change how goals or alerts are configured — clients, executives, or contractors doing non-analytics work. Use Editor for colleagues who help manage your analytics setup — your SEO team, a marketing manager, or a growth analyst who sets up conversion goals and creates funnel reports.
Neither role can delete the site, change billing, or manage other team members. Only the site owner can do that.
Managing Your Team
The Team page shows all current members and pending invites in a single table. From here you can:
- Change a member's role — click the role badge next to their name to switch between Viewer and Editor. The change takes effect immediately; the member doesn't need to log out and back in.
- Remove a member — removes their access to that site instantly. Their statpx account is unaffected; they just lose access to this specific site.
- See pending invites — invites that haven't been accepted yet appear in a separate section. You can resend or cancel them. Pending invites expire after 7 days; if your invitee missed it, cancel the old one and send a fresh invite.
Using Public Share Links (No Login Required)
For clients or stakeholders who just want to see traffic numbers without creating an account, the public share link is the cleanest option. To enable it:
- Go to Site Settings for your site
- Find the Share Link section and toggle it on
- Copy the generated URL and share it with whoever needs it
Anyone with the link can see a read-only view that includes: the summary metric cards (pageviews, sessions, bounce rate, duration), the traffic chart, top pages, top referrers, and country breakdown. The view uses the last 30 days by default and the visitor cannot change settings or see individual visitor data.
What's intentionally hidden from the public view: IP addresses, the raw visitor log, goal configurations, alert settings, team members, and all owner account information. The share link is designed so you can give it to a client or post it publicly without exposing any sensitive data.
If you ever need to revoke access — for example, if a link got shared wider than you intended — go back to Site Settings and click Regenerate Token. The old URL immediately stops working; the new URL is different. Anyone with the old link cannot access the dashboard.
When to Use Each Option
The right choice depends on how much the other person needs to interact with the data:
- Use a team invite when the person needs to browse different pages, apply date filters, view campaign breakdowns, check specific referrers, or manage analytics features. They need an account to do any of this, but the Viewer role keeps them read-only on configuration.
- Use a share link when the person just wants to see whether traffic is up or down, what the top pages are, or where visitors come from. No account friction, instant access, and you stay in full control because you can revoke the link at any time.
A typical agency setup might use both: share links for clients who want monthly traffic visibility, and Editor invites for internal team members who set up goals and run campaign reports. For more background on sharing analytics in a team context, see the team analytics sharing guide. If you're just getting started with statpx, see the getting started guide first.
Start tracking your website for free
statpx gives you privacy-friendly analytics with no cookie banners, no data limits, and no credit card required. Set up takes under 5 minutes.
Get started free →The Bottom Line
Sharing analytics access doesn't have to mean sharing your account password or exporting data into a spreadsheet every month. statpx gives you role-based team invites for people who need regular, structured access, and a shareable public link for anyone who just needs to see the numbers. Set up your team now so the people who act on traffic data can see it directly — without adding friction to your workflow or compromising your account security.