
How to Track Marketing Campaigns in statpx Using UTM Parameters
You send a newsletter. You post on social media. You run a paid ad. All three link to the same landing page — but without campaign tracking, your analytics just shows "500 sessions came in today" with no way to tell which channel drove results. UTM parameters solve this by tagging each link so statpx can attribute every visit to the exact source, medium, and campaign that generated it.
This guide covers how UTM tracking works in statpx, how to build tagged URLs with the built-in campaign builder, and how to read and act on the data you collect.
What Are UTM Parameters?
UTM parameters are short query string tags you append to any URL before sharing it. When a visitor clicks a tagged link, statpx reads those tags and records them alongside the session — so you can later filter your data by exactly which campaign, channel, or message drove that visit.
There are five standard UTM tags:
- utm_source — where the traffic comes from:
newsletter,google,twitter,facebook - utm_medium — the channel type:
email,cpc,social,banner - utm_campaign — the campaign name:
may-launch,black-friday,onboarding-series - utm_term — (optional) paid search keyword:
website+analytics - utm_content — (optional) distinguishes ads or links:
header-cta,sidebar-banner
A complete tagged URL looks like this:
The three required parameters are utm_source, utm_medium, and utm_campaign. The other two are optional but useful when you need to distinguish between multiple ads in the same campaign or two different links in the same email.
How statpx Captures UTM Data
When a visitor arrives on a page with UTM parameters in the URL, statpx's collect.php tracking snippet reads those parameters automatically on the very first hit. No extra configuration is needed beyond having the snippet installed on your site.
A few important details about how statpx handles UTM data:
- Session-level attribution: UTM values are stored at the session level and attributed to the entry page — the first page the visitor landed on during that visit.
- Entry-point only: If a visitor clicks a tagged link and then browses to other pages, the UTM values stay attached to that entire session. The subsequent pages within that session are counted under the same campaign.
- No extra code required: As long as your tracking snippet is installed, UTM capture happens automatically. You don't need to modify the snippet or add any custom JavaScript.
This means you can start tagging your links today and the data will appear in your Campaigns dashboard immediately — no setup beyond what you've already done.
Using the Campaign URL Builder
Building UTM URLs by hand is error-prone — a typo in utm_campaign creates a new campaign row in your reports that's separate from the one you intended. statpx includes a built-in URL Builder to eliminate this problem.
To access it, go to the Campaigns page for your site and scroll to the URL Builder section at the bottom. Fill in the following fields:
- Destination URL — the page you're linking to (e.g.
https://yoursite.com/pricing) - Source — where the link will appear (e.g.
newsletter,google) - Medium — the channel type (e.g.
email,cpc,social) - Campaign — your campaign name (e.g.
may-launch) - Term and Content — optional, fill in if you need them
As you type, the builder generates the complete tagged URL below the form. Click Copy to grab it, then paste it into your email, ad, or social post. The builder automatically URL-encodes spaces and special characters so the link works correctly.
Tip: Use lowercase and hyphens for all UTM values (e.g. may-launch not May Launch). UTM values are case-sensitive in most analytics tools. Inconsistent casing creates duplicate rows in your reports.
Reading the Campaigns Dashboard
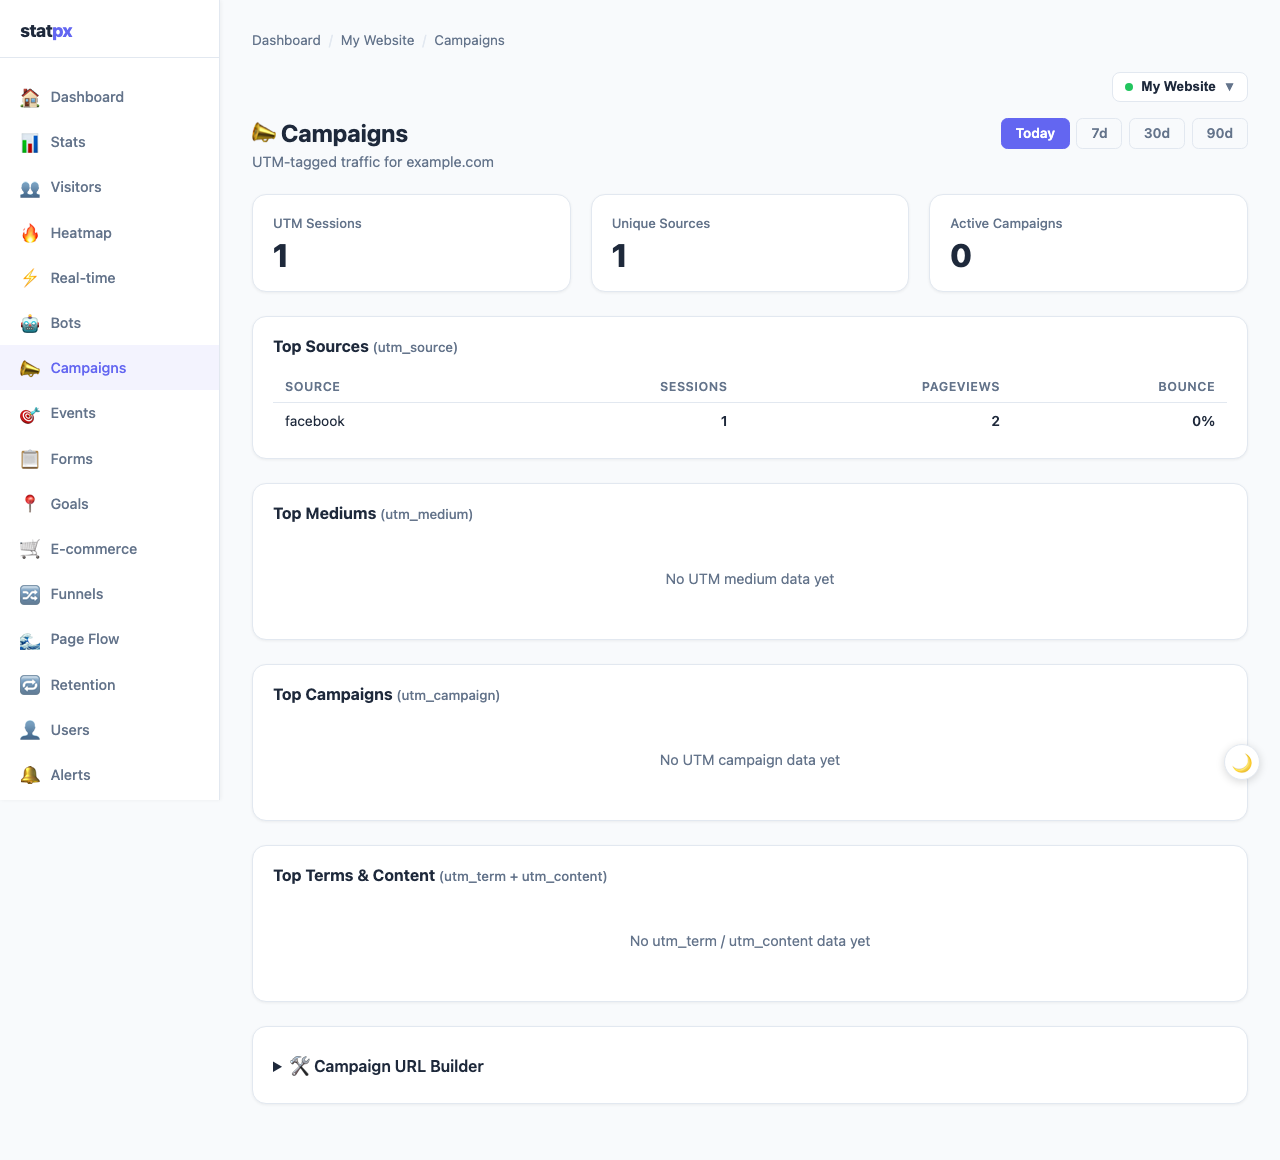
The Campaigns dashboard shows a table of every UTM combination that has driven traffic to your site. Each row displays:
- Source — the utm_source value (e.g. newsletter, google, twitter)
- Medium — the utm_medium value (e.g. email, cpc, social)
- Campaign — the utm_campaign name
- Sessions — how many unique visits came in through that combination
- Pageviews — total pages viewed by those sessions
Click any row in the table to filter the entire dashboard to that campaign. This lets you see which pages that campaign's visitors landed on, where they came from geographically, which devices they used, and whether they completed any conversion goals — all scoped to just those campaign sessions.
Filtering the Dashboard by Campaign
You can also apply campaign filters directly from the main site dashboard without visiting the Campaigns page. Use the filter bar at the top of the stats page and select a UTM dimension from the dropdown — utm_source, utm_medium, or utm_campaign — then choose the specific value you want to focus on.
Combine a campaign filter with a custom date range to answer questions like: "How many sessions did our Black Friday email campaign drive during the week of the promotion?" or "Which landing pages did our paid search visitors hit last month?" This kind of precise attribution is only possible because every session was tagged at the source.
To compare two campaigns side-by-side, open separate browser tabs with different campaign filters applied. This is a practical workaround for quick comparisons without needing a dedicated comparison view.
Best Practices for UTM Tagging
A consistent UTM tagging strategy makes your campaign data useful over time. Here are the conventions that prevent the most common reporting problems:
- Always tag email links — use
utm_medium=emailon every link in every email you send. Email traffic is otherwise classified as direct, which makes it invisible in your channel breakdown. - Use standard medium values —
cpcfor paid search and display ads,socialfor organic social posts,emailfor email campaigns,affiliatefor affiliate links. Consistent medium values let you aggregate across sources. - Keep campaign names consistent across channels — if you're promoting the same product launch via email, social, and paid ads, use the same
utm_campaignvalue on all of them (e.g.may-launch). This lets you see total campaign reach across all channels in one row. - Never UTM-tag internal links — adding UTM parameters to links within your own site overrides the original attribution for that session. A visitor who arrived from a Google ad and then clicked an internal link with
utm_source=internalwould be re-attributed to that internal source, erasing the paid traffic data. - Use utm_content to split-test messages — if you're sending the same campaign to two different email segments with different subject lines, use
utm_content=subject-aandutm_content=subject-bto see which message drove more traffic.
Start tracking your website for free
statpx gives you privacy-friendly analytics with no cookie banners, no data limits, and no credit card required. Set up takes under 5 minutes.
Get started free →The Bottom Line
UTM parameters turn your analytics from a passive traffic counter into an active marketing measurement tool. Once you tag your campaign links consistently, you can answer the question that actually matters: not "how many people visited?" but "which campaign brought them here, and did they convert?" Start by tagging your next email send, run it through the statpx campaign builder, and check the Campaigns dashboard 24 hours later. The data will be there waiting for you.
For advanced use cases — like pulling campaign data into a spreadsheet or a custom report — see the statpx REST API guide.